


Do you want to strengthen your abs and improve your core? Variety is key when it comes to ab exercises. Not only do you work different muscles to strengthen your core, but you won’t get bored if you don’t do different exercises. So forget sit-ups and planks, and you don’t have to lie down to do your ab exercises. Standing ab exercises are also effective ways to strengthen your core without having to get down on the floor.
Standing exercises not only work your ab muscles, like your lats and glutes, but they also improve your posture. We get it: by standing, you can increase your range of motion with each repetition and improve your posture by standing up straight. And you don’t have to do sit-ups or planks or get down on the floor.
Standing exercises also test your balance and stability because your body naturally resists gravity to stay upright. These standing exercises work the same core muscles that you would with a sit-up or plank… or even more.
Standing exercises are also perfect for those with tight hips or discomfort. When someone has hip flexor pain, standing exercises are better than any other exercise. Standing exercises can also mimic the movements of life and perform functional exercises.
This is where standing exercises have an advantage over other ground exercises. It can even be more effective than other exercises because your core muscles are more than just what you see. They surround your body, from six-pack abs to oblique muscles to muscles that stabilize and support the spine. Standing exercises don't require much space. You can do this exercise anytime, anywhere. So what movements can you do with standing exercises? Keep reading to get the answer.
Related Article: 10 Weighted Core Exercises That’ll Challenge Your Abs
Best Standing Abs Workout
Time: 10 minutes | Equipment: Dumbbells/resistance bands are optional | Good for: Abdominal muscles/core muscles
Instructions: If you want to strengthen and fully consume your core strength, you can choose three to four movements from the following movements. Repeat the movements as many times as possible within a certain period, and then move on to the next movement. After completing all the movements, rest for one minute, and then repeat the movements in 3-4 sets.
Standing Oblique Crunch
How to:
1. Stand with your feet hip-width apart and place your hands behind your head, elbows pointed out to the sides.
2. Tighten your core to stabilize your torso.
3. Lift your right knee toward your right elbow as you bring your right elbow down toward your knee. At the same time, twist your torso to the right, bringing your elbow and knee together.
4. Slowly return to the starting position, straightening your leg and bringing your torso back to neutral.
5. Perform the same movement on the left side, bringing your left knee toward your left elbow.

Standing March
How to:
1. Stand tall with your feet hip-width apart. Keep your chest lifted and your core engaged. Place your hands on your hips or allow them to hang by your sides.
2. Slowly lift your right knee towards your chest as if you're marching in place. Aim to bring your knee as high as you can without rounding your back.
3. As you lift your knee, engage your core to help stabilize your torso and maintain balance.
4. Lower your right leg back down to the floor. Repeat the movement with your left leg, lifting the left knee towards your chest.
5. Keep alternating legs, marching in place at a steady pace. Make sure to maintain good posture throughout.

Unilateral Dumbbell March
How to:
1. Stand tall with your feet hip-width apart, holding a dumbbell in one hand (typically your right hand) with your arm fully extended by your side. Keep your other arm at your side or place it on your hip for balance.
2. Tighten your core to maintain balance and stability throughout the exercise. Keep your chest lifted and your posture tall.
3. Raise your right knee towards your chest, similar to a marching movement. As you lift the knee, keep the dumbbell in your right-hand stable at your side without letting it swing. Focus on engaging your core muscles as you balance on your left leg.
4. Lower your right leg back down to the floor slowly.
5. Switch the dumbbell to your left hand, and then lift your left knee toward your chest in the same controlled manner, maintaining balance.
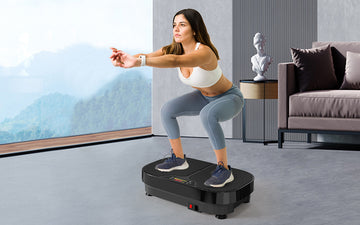
Squat to Twist Press
How to:
1. Stand with your feet shoulder-width apart, holding a dumbbell (or kettlebell) with both hands in front of your chest, elbows bent.
2. Begin by pushing your hips back and bending your knees to lower into a squat. Keep your weight in your heels, and make sure your knees don’t extend past your toes.
3. As you stand back up from the squat, rotate your torso to the right while keeping your hips stable. Extend the dumbbell (or kettlebell) in both hands to your right side, engaging your core to help with the twist.
4. After the twist, immediately press the dumbbell overhead as you return to the center of your body. Your arms should be fully extended above your head, with your palms facing each other.
5. Lower the dumbbell back to your chest, squat down again, and repeat the movement, twisting to the left side this time.

Wood Chop
How to:
1. Stand with your feet shoulder-width apart. Hold a dumbbell, medicine ball, or cable handle with both hands in front of your body. If using a dumbbell or medicine ball, your arms should be extended straight in front of you at chest level. If using a cable machine, start with the cable at a high setting.
2. Keep your knees slightly bent and your chest lifted.
3. Begin by twisting your torso and bringing the weight diagonally down toward your left hip. As you rotate, pivot your back foot (right foot if twisting right), allowing your torso and arms to follow the motion. Your arms should move in a controlled, diagonal line across your body.
4. Focus on using your core and obliques to guide the movement, not just your arms.
5. Reverse the motion in a controlled manner, bringing the weight back to the starting position in front of your chest.
Standing Side Bend
How to:
1. Stand tall with your feet shoulder-width apart, keeping your knees slightly bent.
2. Place your hands on your hips or hold a dumbbell in one hand for added resistance (optional). If using a dumbbell, let it hang by your side with your palm facing your body.
3. Tighten your abdominal muscles to support your lower back and maintain good posture throughout the movement.
4. Slowly bend your torso to the side, bringing your right hand (or the dumbbell) down toward your right knee, while keeping your torso as straight as possible.
5. Avoid twisting or rounding your back—focus on a lateral (side-to-side) movement of the upper body.
6. You should feel a stretch along the left side of your torso as you bend to the right. Engage your obliques (the muscles on the opposite side of the bend) to pull your torso back to the upright position.

Lunging Toe Touches
How to:
1. Stand tall with your feet hip-width apart and your arms at your sides.
2. Take a step forward with your right leg, lowering your body into a lunge. Your right thigh should be parallel to the ground, with your knee aligned over your ankle. The left knee should be hovering just above the ground.
3. Ensure your left leg remains straight and your left heel is off the floor.
4. From the lunge position, reach your left hand toward your right toes (or as close as you can reach). While reaching for the toes, keep your back straight and hinge at the hips to stretch your hamstring.
5. This will deepen the stretch in the back of your right leg (hamstrings) and engage your core.
6. Bring your left hand back to the ground and push off with your right foot to return to a standing position.

Single Leg Deadlift
How to:
1. Stand tall with your feet hip-width apart.
2. Hold a dumbbell or kettlebell in one hand (optional for added resistance) with your palm facing toward your body. You can also perform this exercise without weights to focus on body weight.
Engage your core, and stand with a slight bend in your knees.
3. Shift your weight onto your right leg and keep your left leg slightly bent or straight behind you.
4. Start by hinging at your hips and slowly lowering your torso forward. Your left leg should rise straight behind you as you lower your torso, maintaining a straight line from your head to your left heel.
5. Keep a slight bend in the standing leg (right) knee, and ensure that your back stays flat. Do not round your lower back.

Lateral Leg Circles
How to:
1. Lie flat on your back on a mat or comfortable surface.
2. Place your arms by your sides for stability or rest your hands on your hips.
3. Raise one leg off the ground (say, your right leg) to about 45 degrees while keeping your other leg flat on the floor. Keep the lifted leg straight, with your toes pointed forward.
4. Begin making small circles with your right leg, moving it in a clockwise direction.
5. Focus on keeping the movement controlled, using your hip and thigh muscles to create the circle. Keep your core engaged to prevent your body from shifting or rocking.