As a fitness enthusiast, everyone wants to have well-defined abdominal muscles. But it’s not just about having a set of chiseled abs, it’s about unlocking the potential of your entire body and achieving a level of living that radiates into every aspect of your life. In the pursuit of chiseled abs, the ab wheel plays a big role.
When you go to the gym, imagine a simple and clever ab wheel that can help you strengthen your core muscles. Every time you use the abdominal wheel for exercise, it not only mobilizes your abdominal muscles but also mobilizes core muscles to enhance body stability and strength. Ab roller exercises challenge you to test your physical limits and train your core to withstand any physical challenge. But the ab wheel provides more than just chiseled abs.
If you’re tired of doing sit-ups or planks, ab roller exercises can help you better tone your abdominal muscles. Ab roller exercises don’t just build strong abs and improve your overall fitness, they can also help you maintain balance. To tone your abdominal muscles, you may need to do different exercises for different abdominal muscles. These exercises include the external and internal obliques, pyramidal muscles, rectus abdominis, and transversus abdominis. Ab roller exercises can help you exercise these core abdominal muscles at one time, while also training your upper body muscles and lower body balance.
Ab roller exercises can build functional strength, improve body posture, and even reduce the risk of physical injury. The Ab Wheel is a versatile fitness tool that can help you take control of your fitness journey and unlock your body’s potential. So, whether you are a fitness enthusiast or a professional athlete, if you want to gain extra physical advantages strengthen your core strength, or pursue body balance and confidence, the 8 best abdominal ab roller exercises can help you well.
This blog will give you an in-depth understanding of the 8 best ab roller exercises, and explore the benefits and changes these ab roller exercises can bring to you so that you can better create fitness goals that suit you and customize your core exercise plan. are you ready? Embark on an exciting adventure with ab roller exercises and get ready to take your abdominal core to new heights.
Then let’s get started, let’s join the ab roller exercises program, uncover the mystery of the 8 best abdominal roller exercises, and build your steel core muscle group.

Understanding the Ab Roller: A Core-Strengthening Powerhouse
Do you want to have chiseled abs? Relife Sports Ab Roller is your best choice. This multi-functional fitness tool can help you say goodbye to your big belly and help you shape and strengthen your core muscles.
Mechanics of the Ab Roller
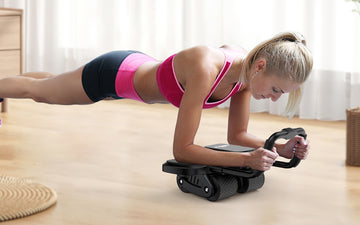
The Ab Roller consists of a simple design featuring a wheel with handles on either side. Its operation leverages the principles of stability and resistance. When you roll out, your body extends into a plank-like position, engaging multiple muscle groups. The instability of the wheel forces your core to work harder to maintain balance, thereby intensifying the workout.
Core Muscles Engaged
The primary strength of the Ab Roller exercises lies in its ability to comprehensively engage the core muscles, including:
1. Rectus Abdominis: The front sheath of your abs, engaged throughout the roll-out motion.
2. Obliques: These side muscles are activated to stabilize your torso during the exercise.
3. Transverse Abdominis: Deep core muscles that are engaged to maintain stability.
4. Lower Back Muscles: The erector spinae is involved, promoting a strong and balanced core.
Benefits Beyond Core Strengthening
The Ab Roller exercises not only strengthens the core but also offers several additional benefits:
1. Improves Posture: Strengthening the core and back muscles, helps in improving overall posture.
2. Enhances Balance and Stability: The instability of the wheel challenges your balance, enhancing core stability.
3. Supports Functional Movements: A strong core improves your performance in daily activities and other sports by supporting functional movements.
4. Reduces Risk of Back Pain: Strengthening the core and lower back, can help in reducing the risk of back pain.
Proper Usage for Maximum Effectiveness
To reap the full benefits of the Ab Roller, proper form and technique are crucial:
1. Starting Position: Begin on your knees with the Ab Roller in front of you. Grip the handles firmly.
2. Rolling Out: Slowly roll the wheel forward, extending your body into a straight line from head to knees. Keep your core tight and engaged.
3. Rolling In: Using your core, pull yourself back to the starting position.
Variations and Progressions
As you become more comfortable and stronger using the Ab Roller, incorporating variations can further challenge your muscles and prevent plateau:
1. Knee Roll-Outs: Perfect for beginners, performed from a kneeling position.
2. Full Roll-Outs: For advanced users, starting from a standing position increases the difficulty.
3. Oblique Roll-Outs: Targets the oblique muscles by rolling out diagonally.
4. Plank to Pike: Adds an extra challenge by picking the hips up as you roll in.
Mastering the 8 Best Ab Roller Exercises
Are you ready to unlock your core potential and get strong abs? Get started now with 8 Ab Roller exercises that will strengthen your abs like never before. Whether you’re a beginner or a fitness enthusiast, these exercises have a workout for everyone.
1. Standard Roll-out
The Standard Roll-out is a fundamental ab roller exercise that targets the core muscles, including the rectus abdominis, obliques, and the muscles of the lower back. It also engages the shoulders, arms, and chest, making it an excellent full-body exercise.
How to:
1. Kneel on the Mat: Place a mat on the floor and kneel on it to provide cushioning for your knees. Your knees should be hip-width apart.
2. Grip the Ab Roller: Hold the ab roller with both hands, palms facing down. Your hands should be directly under your shoulders.
3. Engage Your Core: Before you start, engage your core by pulling your belly button towards your spine. This will help stabilize your body during the roll-out.
4. Initiate the Movement: Slowly push the ab roller away from your knees, extending your body forward.
5. Extend Fully: Continue rolling forward until your body is almost parallel to the ground. The ideal extension varies based on individual flexibility and strength. The goal is to stretch out as much as possible without arching your back or letting your hips sag.
6. Maintain Control: Throughout the movement, keep your core engaged to support your lower back. Your head should be in a neutral position, aligned with your spine.
7. Pull Back: Using your core and arm strength, pull the ab roller back towards your knees, returning to the starting position.

2. Knee Roll-out
The Knee Roll-out is a variation of the ab roller exercise that is slightly less intense than the full Standard Roll-out, making it an excellent starting point for beginners or those looking to focus more specifically on core engagement without overextending. This ab roller exercise primarily targets the rectus abdominis (the “six-pack” muscles), obliques, and deep core stabilizers, while also engaging the shoulders, chest, and arms.
How to:
1. Kneel on the Mat: Place a mat on the floor to provide cushioning for your knees.
2. Grip the Ab Roller: Hold the ab roller with both hands, palms facing down. Position the ab roller on the floor in front of you, so your hands are directly under your shoulders.
3. Engage Your Core: Tighten your core muscles by pulling your belly button towards your spine. This activation is crucial for stability and effectiveness throughout the exercise.
4. Initiate the Movement: Begin by slowly rolling the wheel forward, away from your knees. Keep your arms extended but not locked at the elbows.
5. Extend Your Body: Continue to roll forward, lowering your torso towards the floor. Extend as far as you can while maintaining a straight line from your head to your knees without letting your back arch or hips sag.
6. Maintain Control: Throughout the roll-out, ensure your core remains engaged and your movements controlled. Avoid letting your body drop or collapse.
7. Return to Start: Using your core and arm strength, pull the wheel back towards your knees, returning to the starting position.

3. Wide-Stance Roll-out
The Wide-Stance Roll-out is a variation of the ab roller exercise that offers a different challenge by adjusting the position of your feet. This stance increases stability, making it slightly easier to maintain balance compared to a narrow stance or kneeling position. It’s an excellent way for beginners to transition towards more challenging variations, and it also allows experienced users to focus on the form and depth of the roll-out.
How to:
1. Stand with Your Feet Wide Apart: Position your feet wider than shoulder-width apart, even wider if necessary, to find a stable and comfortable stance.
2. Grip the Ab Roller: Hold the ab roller with both hands, palms facing down, and position it on the floor in front of you. Your arms should be straight but not locked, and positioned directly under your shoulders.
3. Engage Your Core: Before initiating the movement, tighten your core muscles by drawing your belly button towards your spine. This core engagement is crucial for protecting your lower back and enhancing the effectiveness of the exercise.
4. Initiate the Movement: Begin by slowly rolling the ab roller away from your feet, leaning your torso forward as you extend your arms in front of you.
5. Extend Fully: Continue rolling forward until your body is nearly parallel to the floor. The wide stance will help you maintain balance, but be careful not to overextend. Stop at the point where you can maintain control and form without letting your hips sag or your back arch.
6. Maintain Control: Keep your core engaged throughout the movement to support your lower back.
7. Return to Start: Using your core and arm strength, pull the ab roller back towards your feet, returning to the upright starting position.

4. Narrow-Stance Roll-out
The Narrow-Stance Roll-out is a more challenging variation of the ab roller exercise that demands greater stability and core strength. By bringing your feet closer together, you reduce the base of support, which forces your core muscles to work harder to maintain balance throughout the movement. This variation effectively targets the rectus abdominis, obliques, and deep core stabilizers, along with engaging the shoulders, chest, and arms.
How to:
1. Stand with Your Feet Together: Begin by standing with your feet together or no more than hip-width apart, creating a narrow base of support.
2. Grip the Ab Roller: Hold the ab roller with both hands, palms facing down, in front of you on the floor. Ensure your arms are straight but not locked at the elbows, positioned directly under your shoulders.
3. Engage Your Core: Activate your core muscles by drawing your belly button towards your spine. This engagement is crucial for maintaining stability and protecting your lower back.
4. Initiate the Movement: Slowly roll the ab roller away from your feet, leaning forward and extending your arms in front of you.
5. Extend Fully: Continue rolling forward until your body is nearly parallel to the floor, or as far as you can manage without losing form. The narrow stance will challenge your ability to balance, so focus on control.
6. Maintain Control: Throughout the movement, ensure your core remains tight and engaged. Avoid letting your hips sag or your back arch excessively.
7. Return to Start: Use your core and arm strength to pull the ab roller back towards your feet, returning to the upright starting position.
Key Points

5. Oblique Roll-out
The Oblique Roll-out is a variation of the ab roller exercise specifically designed to target the oblique muscles on the sides of the abdomen, in addition to engaging the overall core, including the rectus abdominis and the deep core muscles. This variation also works the shoulders, arms, and back, providing a comprehensive upper body and core workout. By angling the roll-out to the sides, you can effectively isolate and strengthen the obliques, which are crucial for rotational strength, stability, and a well-defined waistline.
How to:
1. Kneel or Stand: Choose your starting position based on your fitness level and comfort with the exercise. Kneeling reduces the intensity, making it suitable for beginners or as a progression step.
2. Grip the Ab Roller: Hold the ab roller with both hands, palms facing down, placing it on the floor in front of you. Ensure your arms are straight but not locked at the elbows, positioned directly under your shoulders.
3. Engage Your Core: Activate your core by drawing your belly button towards your spine. This engagement is crucial for maintaining stability and protecting your lower back throughout the movement.
4. Initiate the Movement: Instead of rolling straight forward, angle the roll slightly to the left or right, aiming for about a 45-degree angle relative to your starting position.
5. Extend Fully: Slowly roll the ab roller out, following the angled path, until your torso is lowered towards the floor. Extend as far as you can manage without losing form or control. The side you’re angling towards will experience a more intense contraction.
6. Maintain Control: Keep your core tight and engaged to prevent any sagging or arching in your back.
7. Return to Start: Use your core, particularly the obliques, to pull the ab roller back towards your starting position. Then, prepare to repeat the movement on the opposite side.

6. V Roll-outs
The V Roll-out is an advanced variation of the ab roller exercise that targets the core muscles with a focus on the obliques and the rectus abdominis. This variation involves rolling out in a V-shaped path, alternating between the left and right sides, which enhances the engagement of the oblique muscles as well as the overall core stability and strength. The V Roll-out not only strengthens the core but also challenges and improves balance and coordination.
How to:
1. Kneel or Stand: Depending on your proficiency with the ab roller and the intensity level you’re prepared for, start either in a kneeling position (less intense) or standing position (more intense).
2. Grip the Ab Roller: Hold the ab roller with both hands, palms facing down, positioning it on the floor in front of you. Make sure your arms are extended and positioned directly under your shoulders.
3. Engage Your Core: Tighten your core by pulling your belly button towards your spine. This core activation is crucial for maintaining stability and protecting your lower back.
4. Initiate the Movement to the Right: Begin by rolling the ab roller diagonally to the right, creating one side of the V shape. Extend as far as you can manage without losing form—your body should move in a controlled, diagonal path.
5. Return to Start: Use your core muscles, especially your obliques, to pull the ab roller back towards your starting position.
6. Roll Out to the Left: Next, roll the ab roller diagonally to the left, completing the other side of the V shape. Ensure you extend as far as you can while maintaining proper form.
7. Return to Start Again: Pull the ab roller back towards the starting position, engaging your core and obliques.

7. One-Arm Roll-out
The One-Arm Roll-out is an extremely challenging variation of the ab roller exercise that significantly increases the demand on your core, particularly emphasizing unilateral strength and stability. This advanced exercise not only targets the rectus abdominis and obliques but also engages the shoulders, chest, and arms, requiring and developing a high level of balance and coordination. Due to its difficulty, it’s crucial to have mastered the standard ab roller roll-out and possess strong core stability before attempting the one-arm variation.
How to:
1. Kneel or Stand: Depending on your level of expertise with the ab roller and desired intensity, start in either a kneeling position (less intense) or a standing position (more intense). For most, beginning with the kneeling position is advised.
2. Grip the Ab Roller with One Hand: Hold the Ab Roller with one hand in the center of the handle. Your arm should be straight but not locked at the elbow, positioned directly under your shoulder.
3. Engage Your Core: Activate your core muscles by drawing your belly button towards your spine. This core activation is essential for maintaining stability and protecting your lower back.
4. Initiate the Movement: Slowly roll the ab roller away from you, keeping your arm aligned with your body. The challenge is to prevent your body from rotating as you extend forward.
5. Extend Your Body: Continue rolling forward, lowering your torso towards the floor. Extend as far as you can while maintaining control and without letting your hips sag or back arch excessively.
6. Maintain Stability: Focus on keeping your core engaged throughout the movement to stabilize your body and prevent rotation. Your free hand can be placed on your hip or extended out to the side for additional balance.
7. Return to Start: Using your core and the strength of your arm, pull the ab roller back towards your starting position.

8. Plank to Roll-out
The Plank to Roll-out exercise combines the stability challenge of a plank with the dynamic movement of an ab roller roll-out, creating an advanced core workout that targets not only the rectus abdominis and obliques but also engages the shoulders, lower back, and hip flexors. This exercise variation is excellent for those who have already mastered the standard ab roller roll-out and are looking for ways to further challenge their core stability and strength.
How to:
1. Start in a Plank Position: Begin in a plank position with your hands on the handles of the ab roller, which should be positioned directly under your shoulders. You can choose to perform this exercise from a kneeling position (less intense) or your toes (more intense), depending on your core strength and proficiency with the exercise.
2. Engage Your Core: Tighten your core by pulling your belly button towards your spine and squeezing your glutes. This engagement is crucial for maintaining stability throughout the exercise.
3. Transition to Roll-out: From the plank position, slowly start to roll the ab roller away from you, extending your arms and lowering your torso towards the floor.
4. Extend Fully: Continue rolling the ab roller forward until your body is fully extended, aiming to reach a position where your body forms a straight line from your head to your knees (if kneeling) or to your heels (if on your toes), without compromising your form.
5. Hold and Return: Briefly hold the fully extended position to maximize core engagement, then carefully pull the ab roller back towards your feet, returning to the initial plank position.

The Bottom Line
If you want to know the benefits of using ab rollers to build core strength, you can refer to: Do Ab Rollers Work to Build Core Strength? 8 Benefits of Doing Ab Rollouts. After reading this blog, you can better understand ab roller exercises for beginners or intermediate and advanced users. The ab roller is an excellent piece of fitness equipment that can help you strengthen your core muscles. If you want to strengthen and shape your core muscles, you can incorporate 8 abdominal ab roller exercises into your daily exercise to improve and stabilize your body’s functional strength. From basic exercises to challenging ab roller exercises, this article has you covered. Ready to feel and achieve your fitness goals with ab roller exercises? Your strong and sculpted core awaits!

